on
Generating a static website with Hugo and hosting it on GitHub
I thought that the first real post on this blog could be about how the blog is actually set up. So let’s have a peak under the hood.
Background
I’m a fairly technical person and I’m pretty comfortable with the command line, git and writing markdown, so I wanted to go with an option that could support these. I have worked with a couple of CMS based solutions before and they are all really great (e.g. wordpress and the likes) and you can get up and running with just a couple of clicks. But I really like to version my work with git and writing markdown feels pretty simple, straight forward and a great fit for the blogging format - and I can bring my own editor!
Simple choices
I’ve choosen the static site generator Hugo for turning my markdown posts into html. I have no need - or a very modest need - for dynamics on the final website/blog, so this will do just fine. Once a blog post is written and published it is most likely never changed - so a static website is a great fit.
By going with a static website an easy choice for hosting is GitHub - this would by the way be a two birds with one stone kind of choice because this would enable me to create a git repository to version control all the posts (and additional content) - perfect!
So now I have the basics in place - let’s make it happen.
Step 1 - hello world
So I wanted to setup a repository on GitHub and point my domain jensandresen.com to it. To do this I created a GitHub repository named according to their convention for hosting personal websites - in my case it was jensandresen.github.io which basically is [your-username].github.io. This enables you to browse the contents of the repository as a website and by visiting http://jensandresen.github.io in your browser. To verify that everything is working so far, I created a basic index.htmpage in the root of the repository and pushed the commit to GitHub. After a couple of seconds (or maybe a minute) I was able to browse that page with my browser. Okay, it’s verified - it works!
Step 2 - set up Hugo
So I’ve decided to go with Hugo but I didn’t want to install it on my system. Instead I wanted it to run inside a Docker container, so I have the option to build the site anywhere and more importantly version control my environment setup. There was a couple of pre-made container images on docker hub, but I decided to write my own:
FROM alpine

RUN apk add curl
RUN apk add tar

WORKDIR /usr/local/bin
RUN curl -o dl-hugo.tar.gz -L https://github.com/gohugoio/hugo/releases/download/v0.69.2/hugo_0.69.2_Linux-64bit.tar.gz

RUN tar -xvzf ./dl-hugo.tar.gz

WORKDIR /blog

EXPOSE 1313

ENTRYPOINT [ "hugo" ]
You can see that I create a /blog folder and I intend to mound the contents of a folder on my host machine into that folder and run Hugo on it. First, though, I have to build the continer image:
$ docker build -t blog-builder .
I should now have a container image called blog-builder that I can run from the command line with:
$ docker run -it blog-builder
Step 3 - repository file and folder structure
So since I’ve choosen GitHub as my hosting it brings with a small caveat. When you host a website on your personal account, it can only serve content from the root of your repository. I have a small issue though - I also have to have all the Hugo files and my Dockerfile somewhere in the repository as well. I decided to kind of hide that away in a hidden ./.blog folder in the root of the repository. Within that folder I then created another folder ./.blog/hugo that would contain all the files and folders that comes out of using Hugo to initialize a website.
So my repository structure would look like the following at this point:
.
├── .blog
│   ├── hugo
│   │   ├── archetypes
│   │   ├── content
│   │   ├── static
│   │   ├── themes
│   │   └── config.yaml
│   └── Dockerfile
├── .git
│   ├── (omitted)
│   └── ...
├── .gitignore
└── index.htm (<-- from the hello world step)
Step 4 - a small script to kick everything off
Now I said before that I like working on the command line and I’m a big fan of good old Make and Makefiles, so I would put together a Makefile that I could run from the root of the repository. Please note that I’m using Make more as a task runner than what it was originally intended to be used for - but for this, it’s convenient and it will get the job done.
Here is the final result of the makefile:
TAG=blog-builder
CONTENT=${PWD}/.blog/hugo
PUBLISHED_CONTENT=$(CONTENT)/public/
PORT=1313
WWWROOT=${PWD}

init:
	@cd .blog && docker build -t $(TAG) .

hugo:
	@cd .blog && docker run -it --rm -p 1313:1313 -v "$(CONTENT)":/blog $(TAG) $(args)

server:
	@cd .blog && docker run -it --rm -p 1313:1313 -v "$(CONTENT)":/blog $(TAG) server -D --bind=0.0.0.0

clean:
	@cd .blog && chmod +x clean.sh && sh ./clean.sh

prepare-content:
	@cd .blog && docker run -it --rm -p 1313:1313 -v "$(CONTENT)":/blog $(TAG) --cleanDestinationDir

copy-content:
	@cp -r $(PUBLISHED_CONTENT) $(WWWROOT)

publish: clean prepare-content copy-content

preview:
	@docker run --rm -p 1313:80 -v "$(WWWROOT)":/usr/share/nginx/html:ro nginx
As you can tell from the above I’ve added a clean up target and a clean up script to go along with it. I felt that this was needed because I have to copy all the published content from Hugo into the root of the repository, so GitHub can serve it as a website.
The clean up script could be many things, but I ended up with:
#! /usr/bin/env bash

cd ..

shopt -s extglob
rm -Rfv !("makefile"|".git"|".blog"|".gitignore") 2> /dev/null
shopt -u extglob

cd ./.blog
It will just remove all files and folders from the root except those that we need to rebuild the entire site again.
You can also spot in the Makefile that I’ve included a preview target that will spin up an nginx server that serves the content in the root of the repository. This way I should be able to inspect the final version of the site before I push the commit to GitHub (and make the changes live).
Step 5 - custom domain
So in my case a actully want my own domain name https://www.jensandresen.com to serve the content. To do that you only have to do one more step.
First off you need your own domain and when you’ve bought that you need to configure a couple of a records.
“An A record maps a domain name to the IP address (Version 4) of the computer hosting the domain."
For more information on a records
You need to add A records to your DNS configuration for your domain to point your actual domain name to the servers where GitHub will host your website - like mentioned above it will map your domain name to the IP address of a GitHub server (we will add a couple of these mapping entries). For copy-pasteable reasons, these are the current IP addresses for GitHub pages servers:
185.199.108.153
185.199.109.153
185.199.110.153
185.199.111.153
Please note: at the time of writing, these are the official IP addresses of the GitHub servers, but they are subject to change so please use the ones from GitHub’s documentation (find a link for it further down).
You also need to setup a CNAME record.
"CNAME records can be used to alias one name to another."
For more information on CNAME records
We do this to map (alias) my domain name to your GitHub pages url (in this case mine is jensandresen.github.io). This means that my domain name will be an alias for my GitHub pages url.
So, I’ve bought my domain through namecheap and under Advanced DNS configurations for my domain, I’ve added these records:
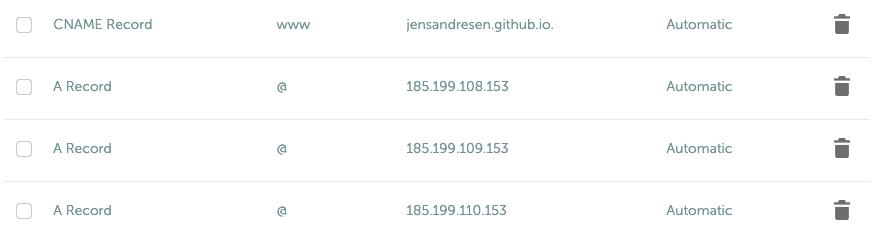
Now I need to make a couple of minor changes to my repository on GitHub. First I need to enable “GitHub Pages” for the repository by going to the settings tab:
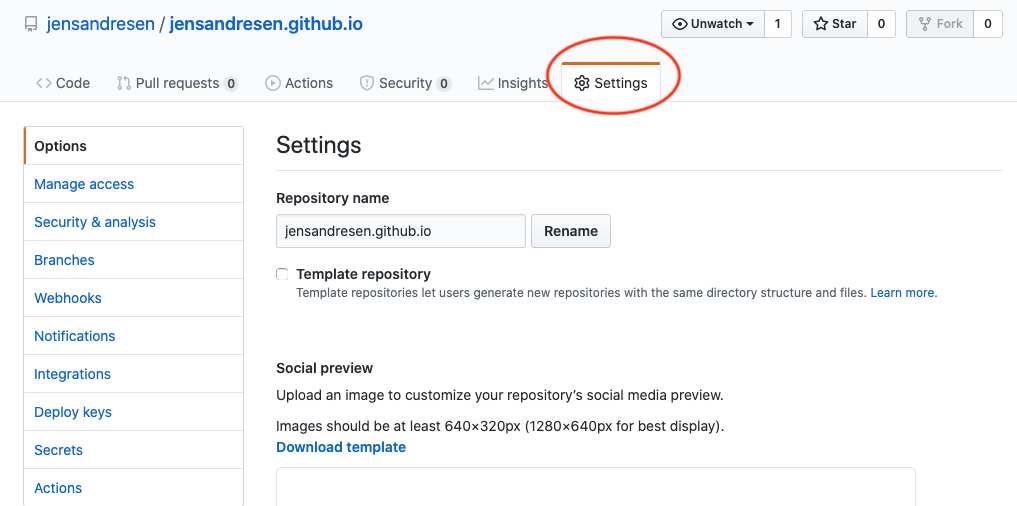
…and scroll down to the “GitHub Pages” section and point it to my custom domain like this:
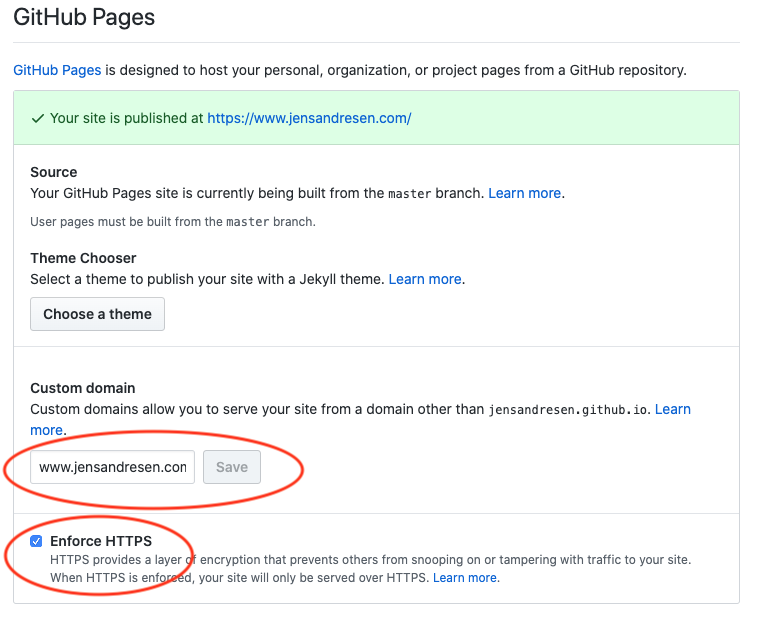
Remember to also enable HTTPS.
The final thing to do with the repository is to include a CNAME file (a text file named CNAME without an extension) in the root of the repository that contains the alias like so:
www.jensandresen.com
I’ve added it as a static asset in Hugo so it will be included as part of the build process and located in the root of the repository when I run the build process.
Thats about it!
For more information about how to setup your GitHub pages, have a look at the article “working with GitHub pages” from GitHub.
Summary
So with just a few simple scripts, Docker, Make and Hugo it’s fairly simple to setup a static website build process and serve it from a personal GitHub account. It is not necessary to do it this way, but this is the way I’ve choosen to do it - for now. To serve a static website from GitHub to just need to put the assets in the root of a repository and then enable GitHub Pages for that repository.
Have fun with it!